Setting up loyalty points
Choose how customers earn points, name and colour your programme, add rewards, adjust balances, and see what your customer gets in their account.
Loyalty Points lets customers earn points on their orders and trade them for products you choose. Every order builds towards a reward, which gives customers a reason to come back. You set it up under Plugins, then Loyalty Points.
Considerations
- Loyalty Points is a paid plugin. Installing it starts a free trial. Your plan and trial status sit at the top of the page.
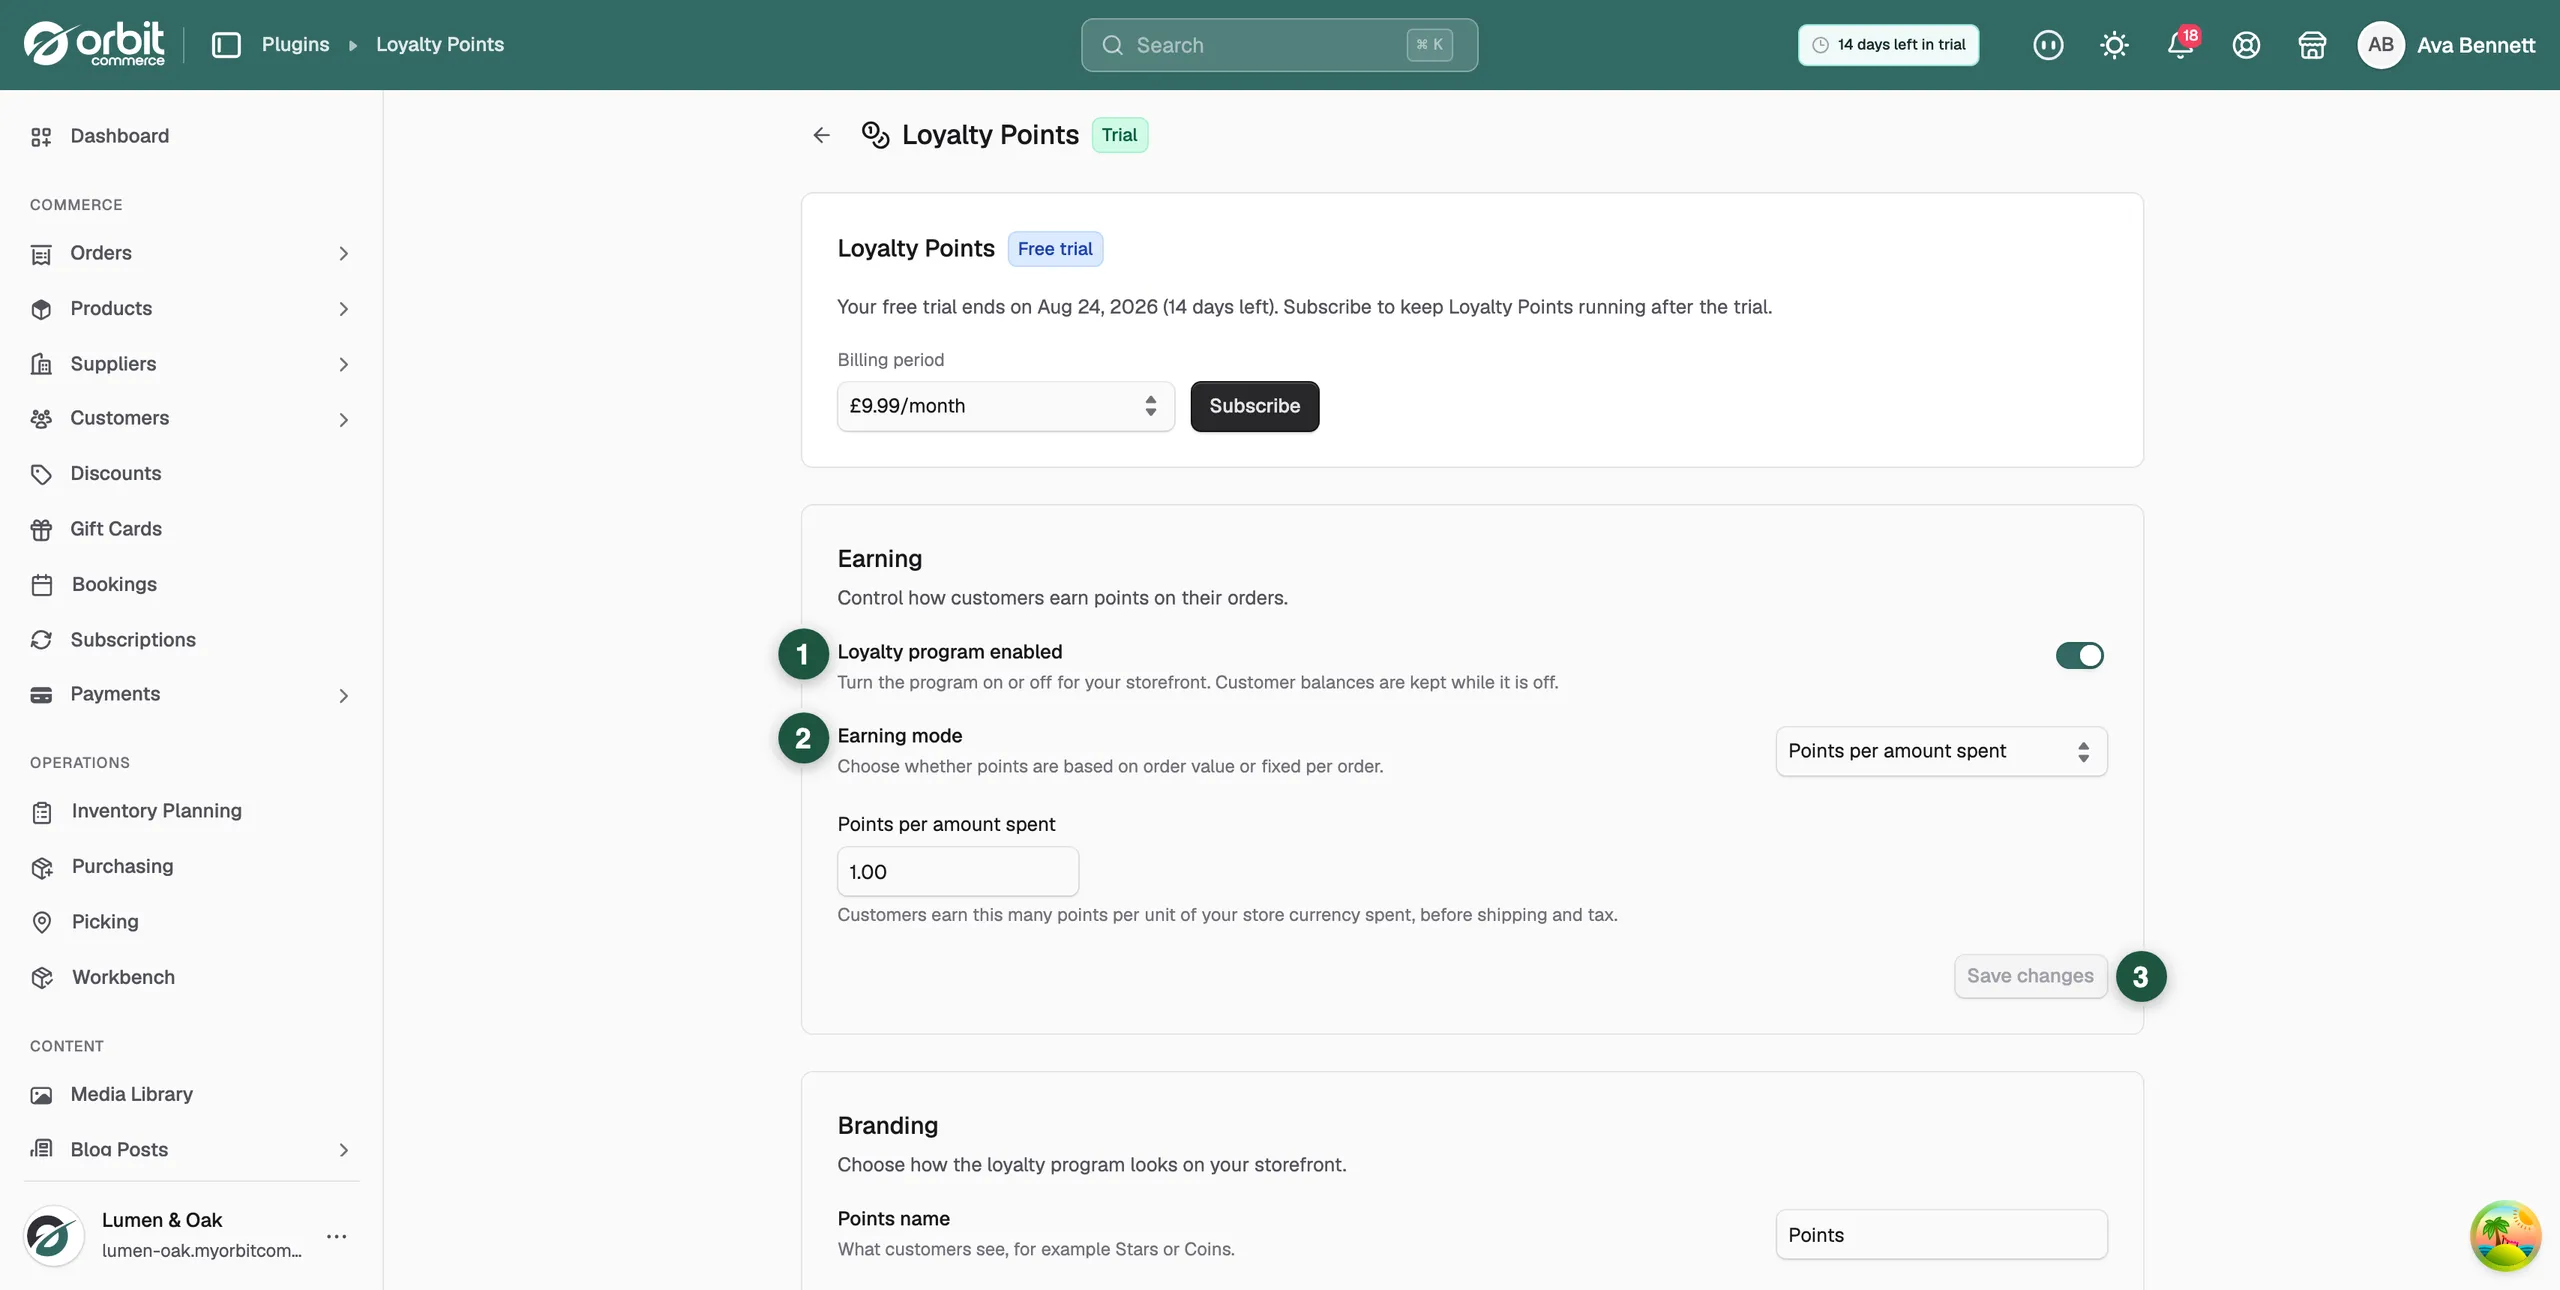
- The page has four cards: Earning, Branding, Rewards and Customers. Each card saves on its own. Save one card before you change the next.
- Points are awarded when an order is paid. Changing the earning rule affects future orders only. Points already earned are not recalculated.
- Turning the programme off never wipes balances.
Turn the programme on or off
- From your Orbit dashboard, go to Plugins, then Loyalty Points.
- On the Earning card, use the Loyalty program enabled switch. Off hides the programme on your storefront. Customer balances are kept while it is off.
Set how customers earn points
- On the Earning card, under Earning mode, choose Points per amount spent or Fixed points per order.
- Enter the number of points in the field below the mode. For Points per amount spent, customers earn that many points for each unit of your store currency, before shipping and tax. For Points per order, they earn that many points on every completed order, whatever its value.
- Click Save changes on the Earning card. The message Loyalty settings saved appears.
Tip: Fixed points per order is easier to explain: earn 10 points on every order. Points per amount spent rewards bigger baskets.
Name your points and pick a colour
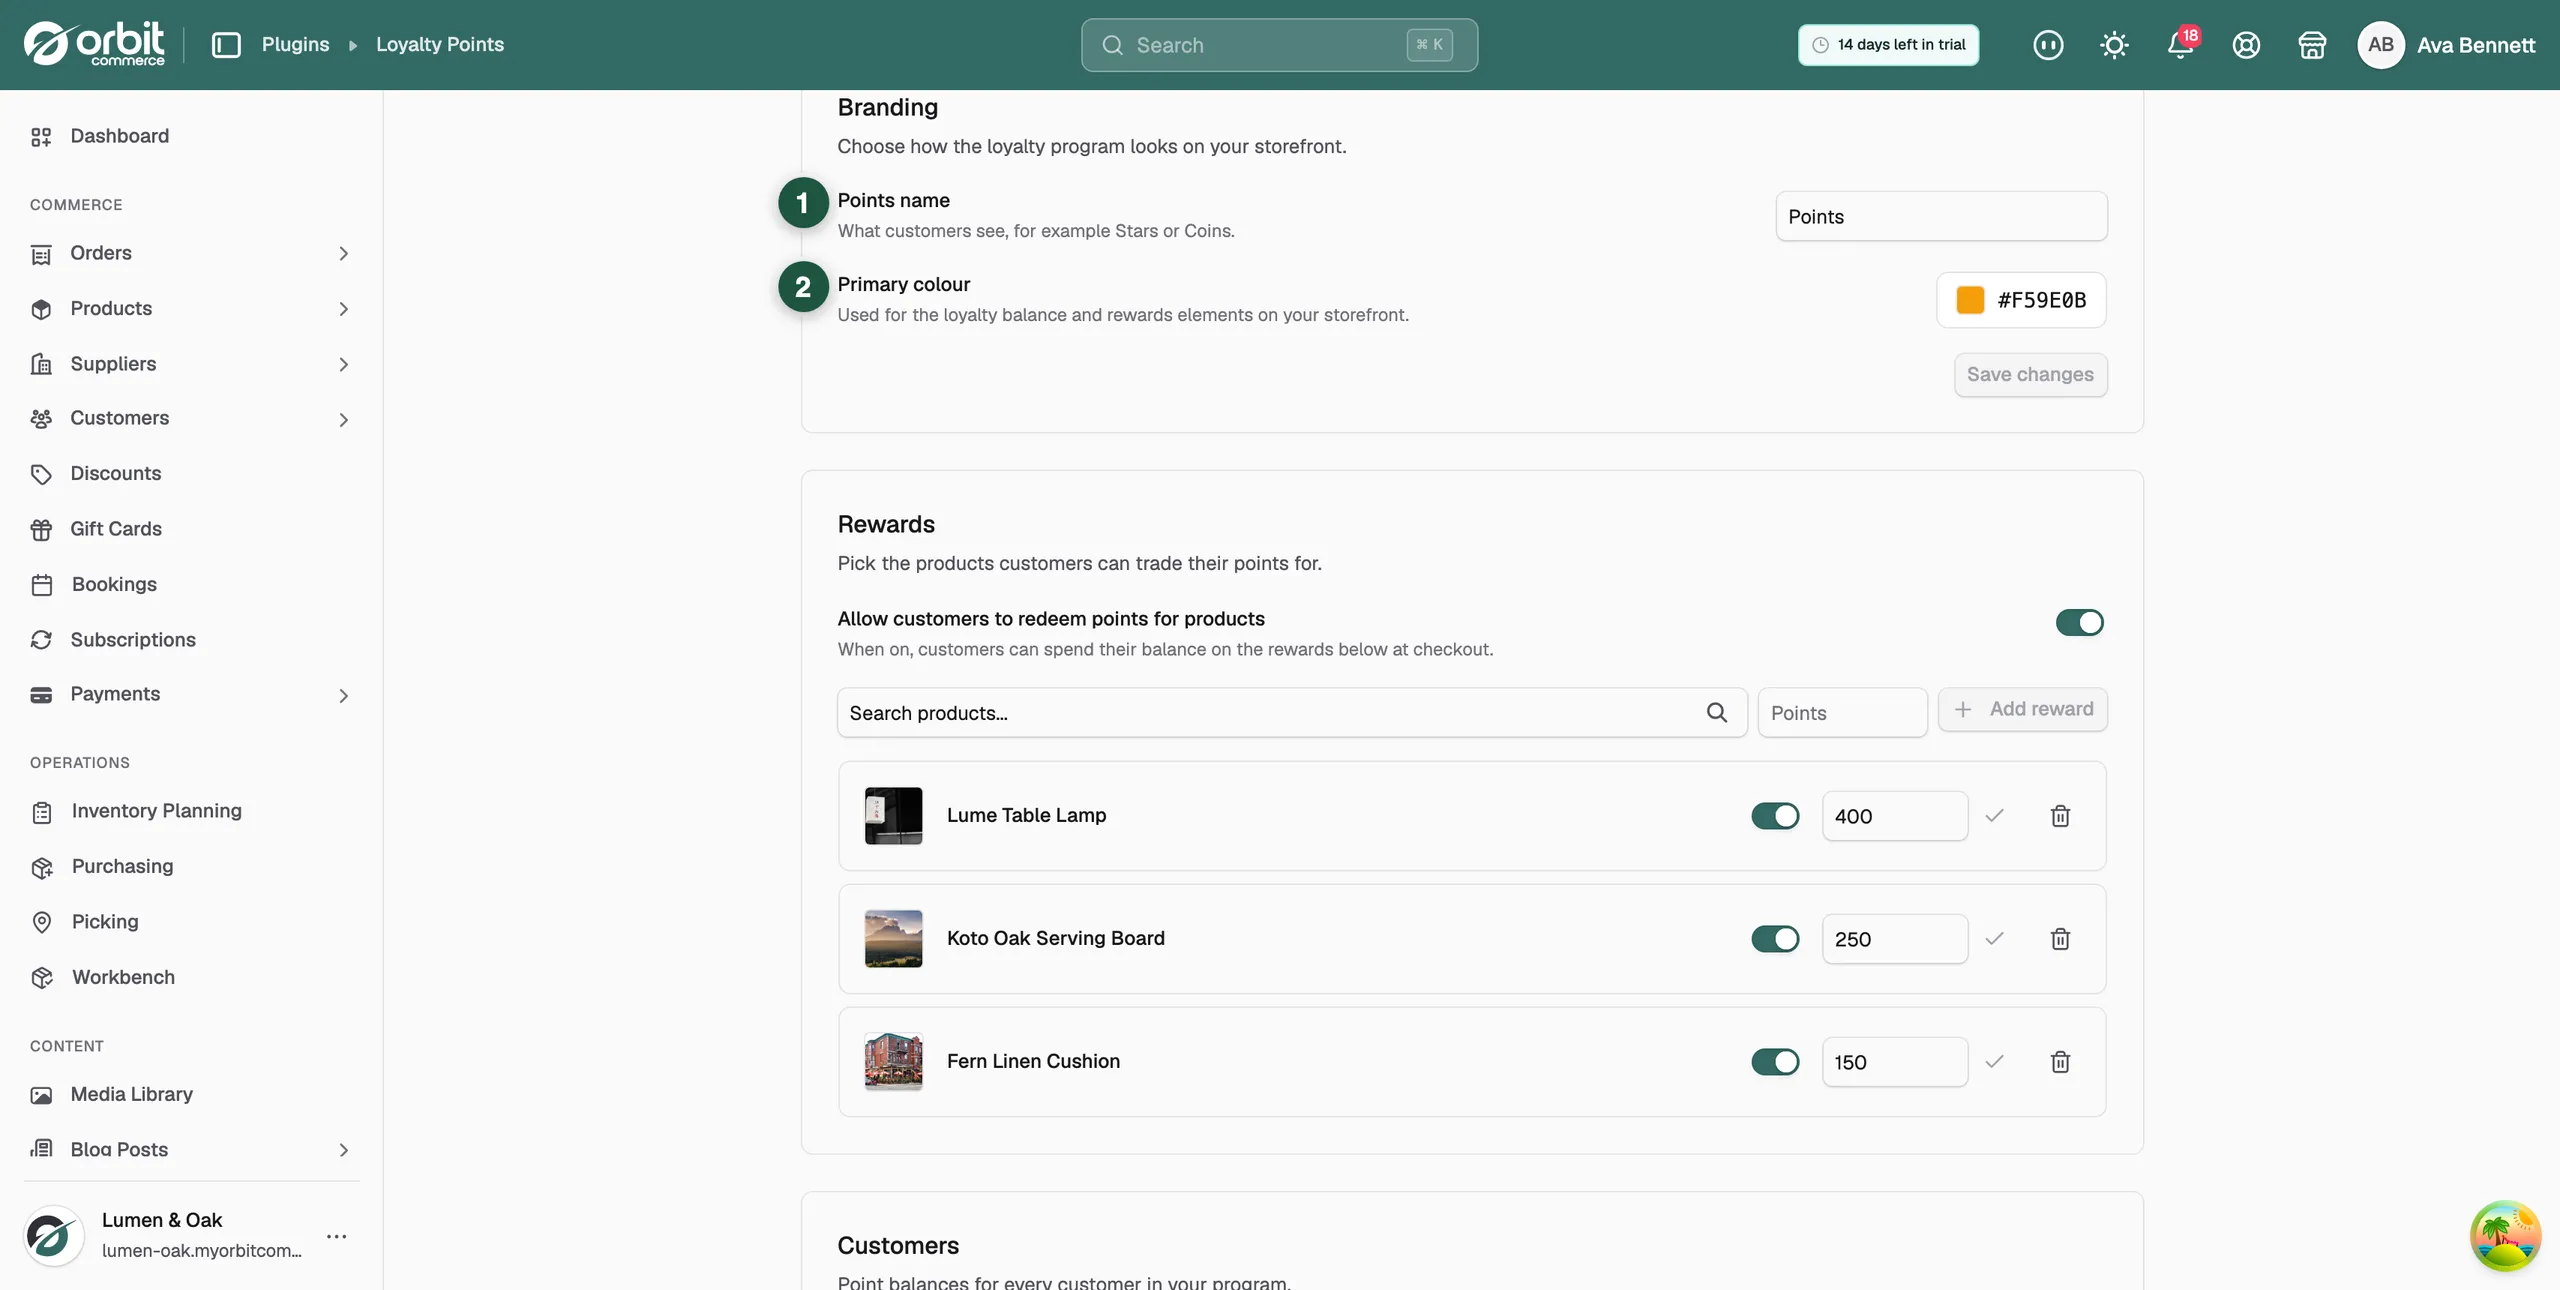
- On the Branding card, in Points name, type what customers see, for example Stars or Coins. Leave it as Points if you prefer.
- Click the Primary colour swatch and pick a colour, or choose one of the ready-made colours. It is used for the loyalty balance and rewards elements on your storefront.
- Click Save changes on the Branding card.
Add a reward
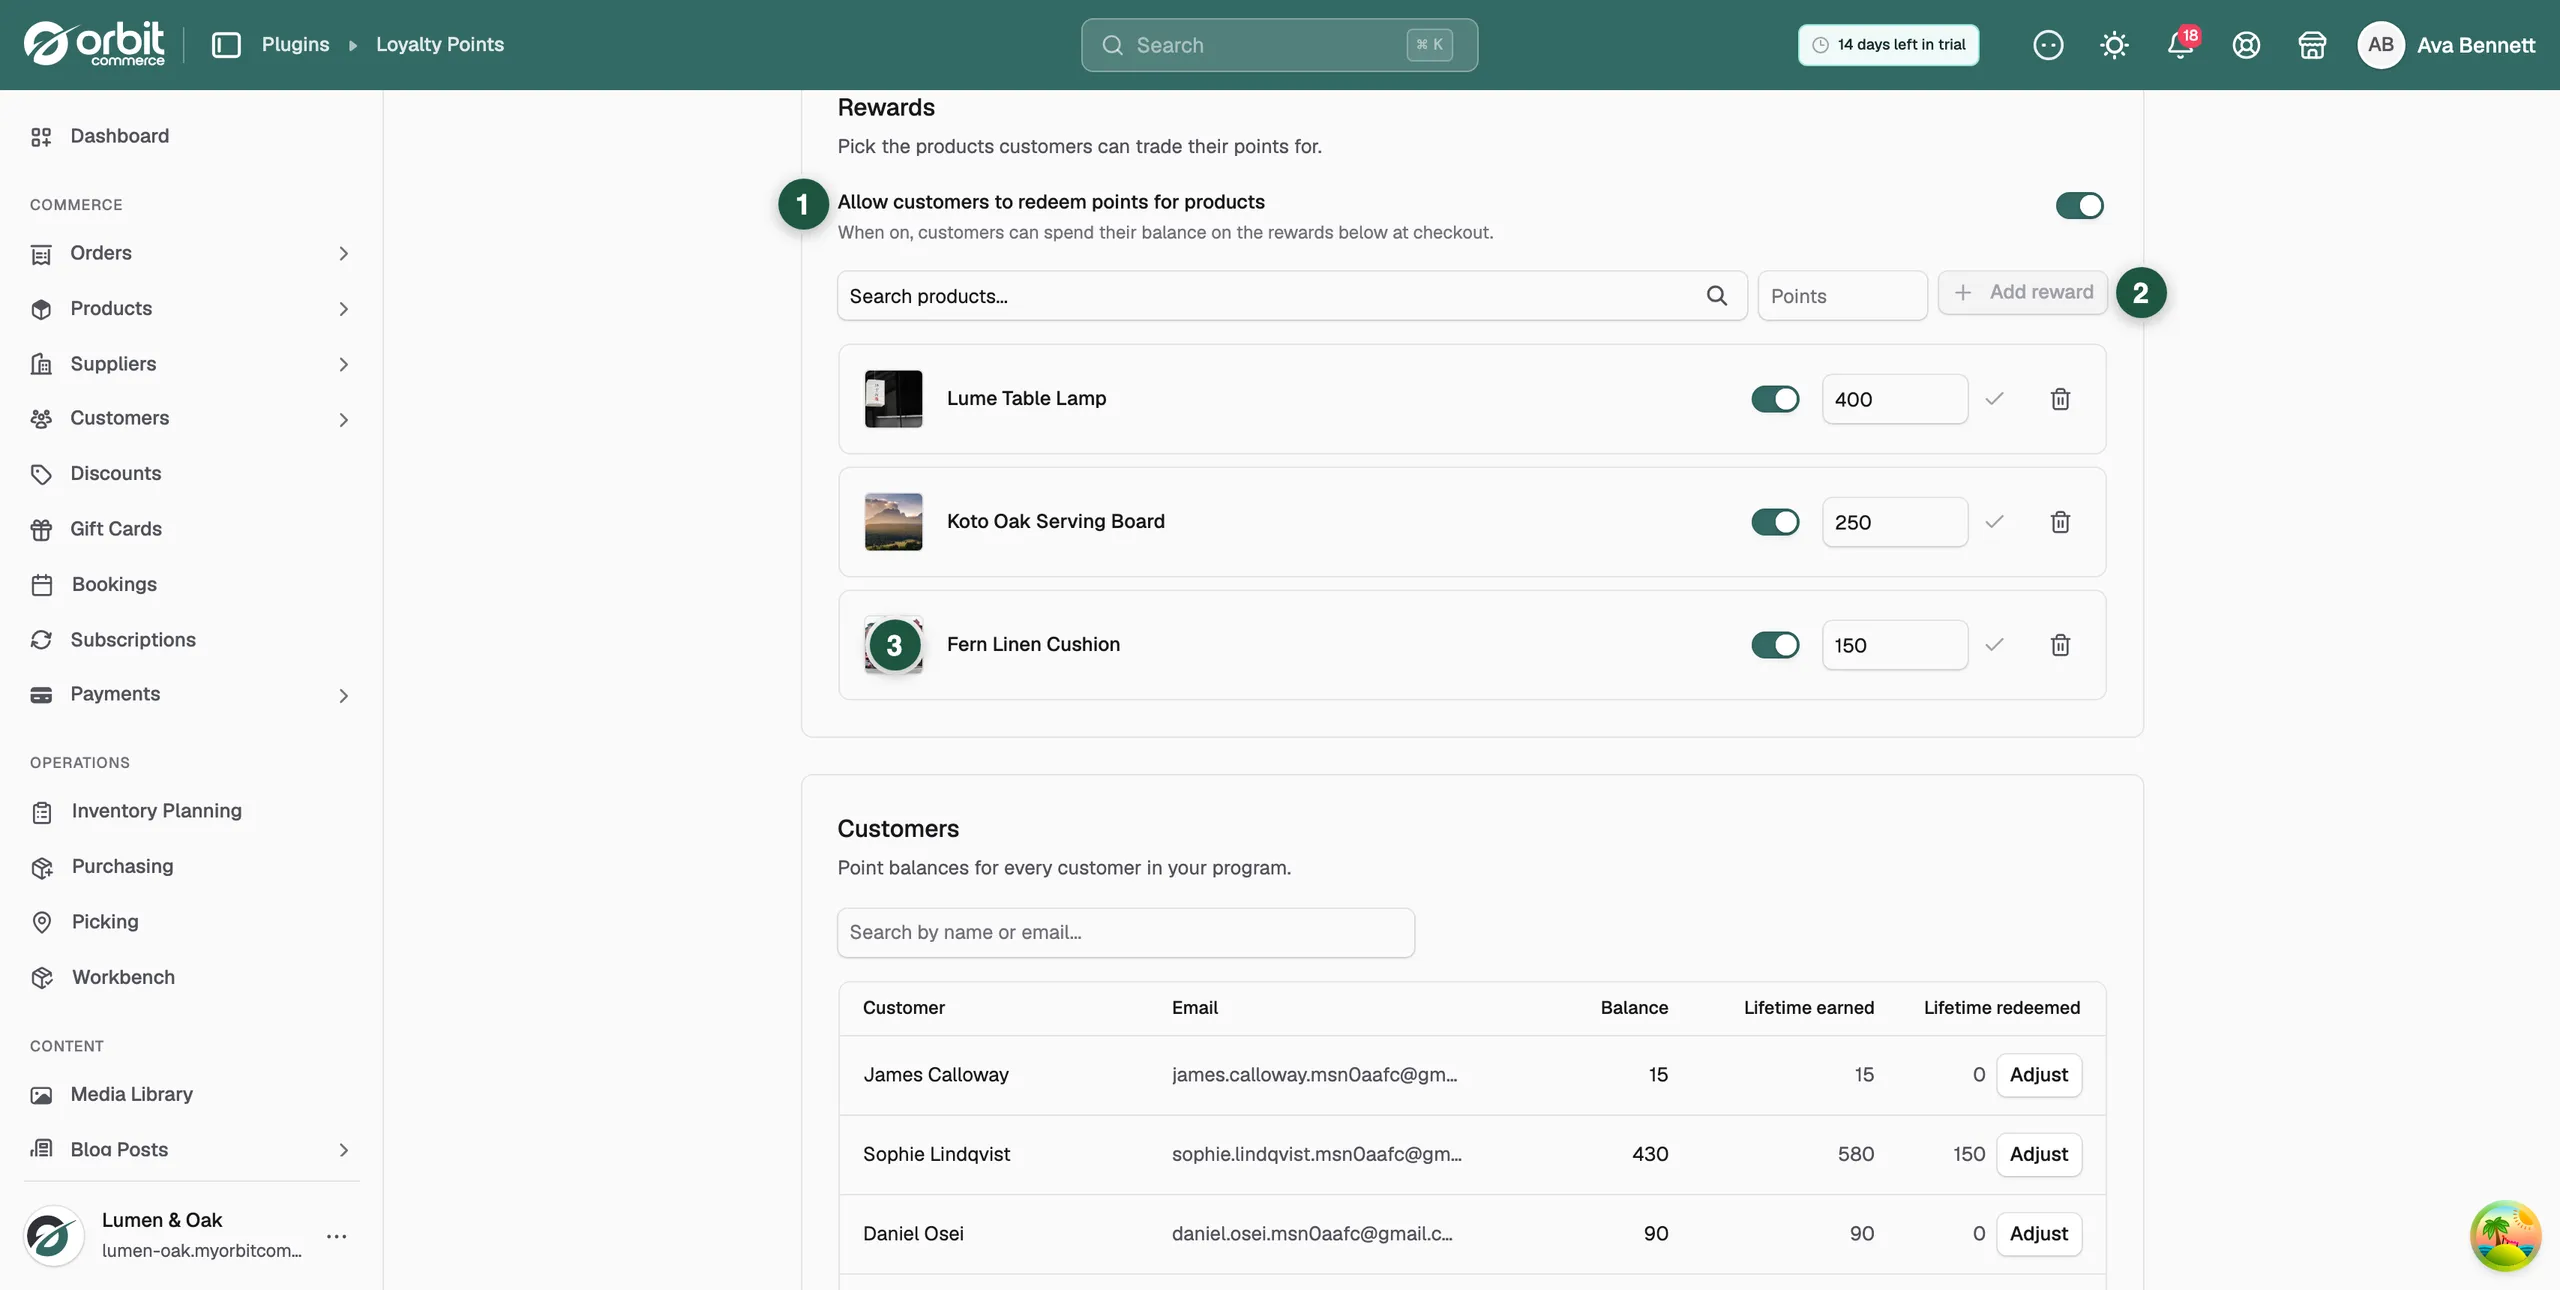
- On the Rewards card, keep Allow customers to redeem points for products switched on. When it is off, customers cannot spend their balance. This switch saves as soon as you change it.
- In the Search products... field, type part of a product name and pick the product. Any product in your catalogue can be a reward.
- In Points price, enter a whole number of points, 1 or more.
- Click Add reward. The message Reward added appears. The reward is listed below with its photo, a switch, its own points field and a remove button.
Change or remove a reward
- Hide a reward: switch it off. The message Reward is hidden from customers appears. Switch it on again to show it. The reward is not deleted.
- Change the points price: edit the number in the reward's own field, then click the tick next to it. The message Points price updated appears.
- Remove a reward: click the remove button on its row. The prompt Remove [product] from rewards? opens. Click Remove reward to confirm, or Keep reward. Removing a reward never affects customer balances.
Check and adjust customer balances
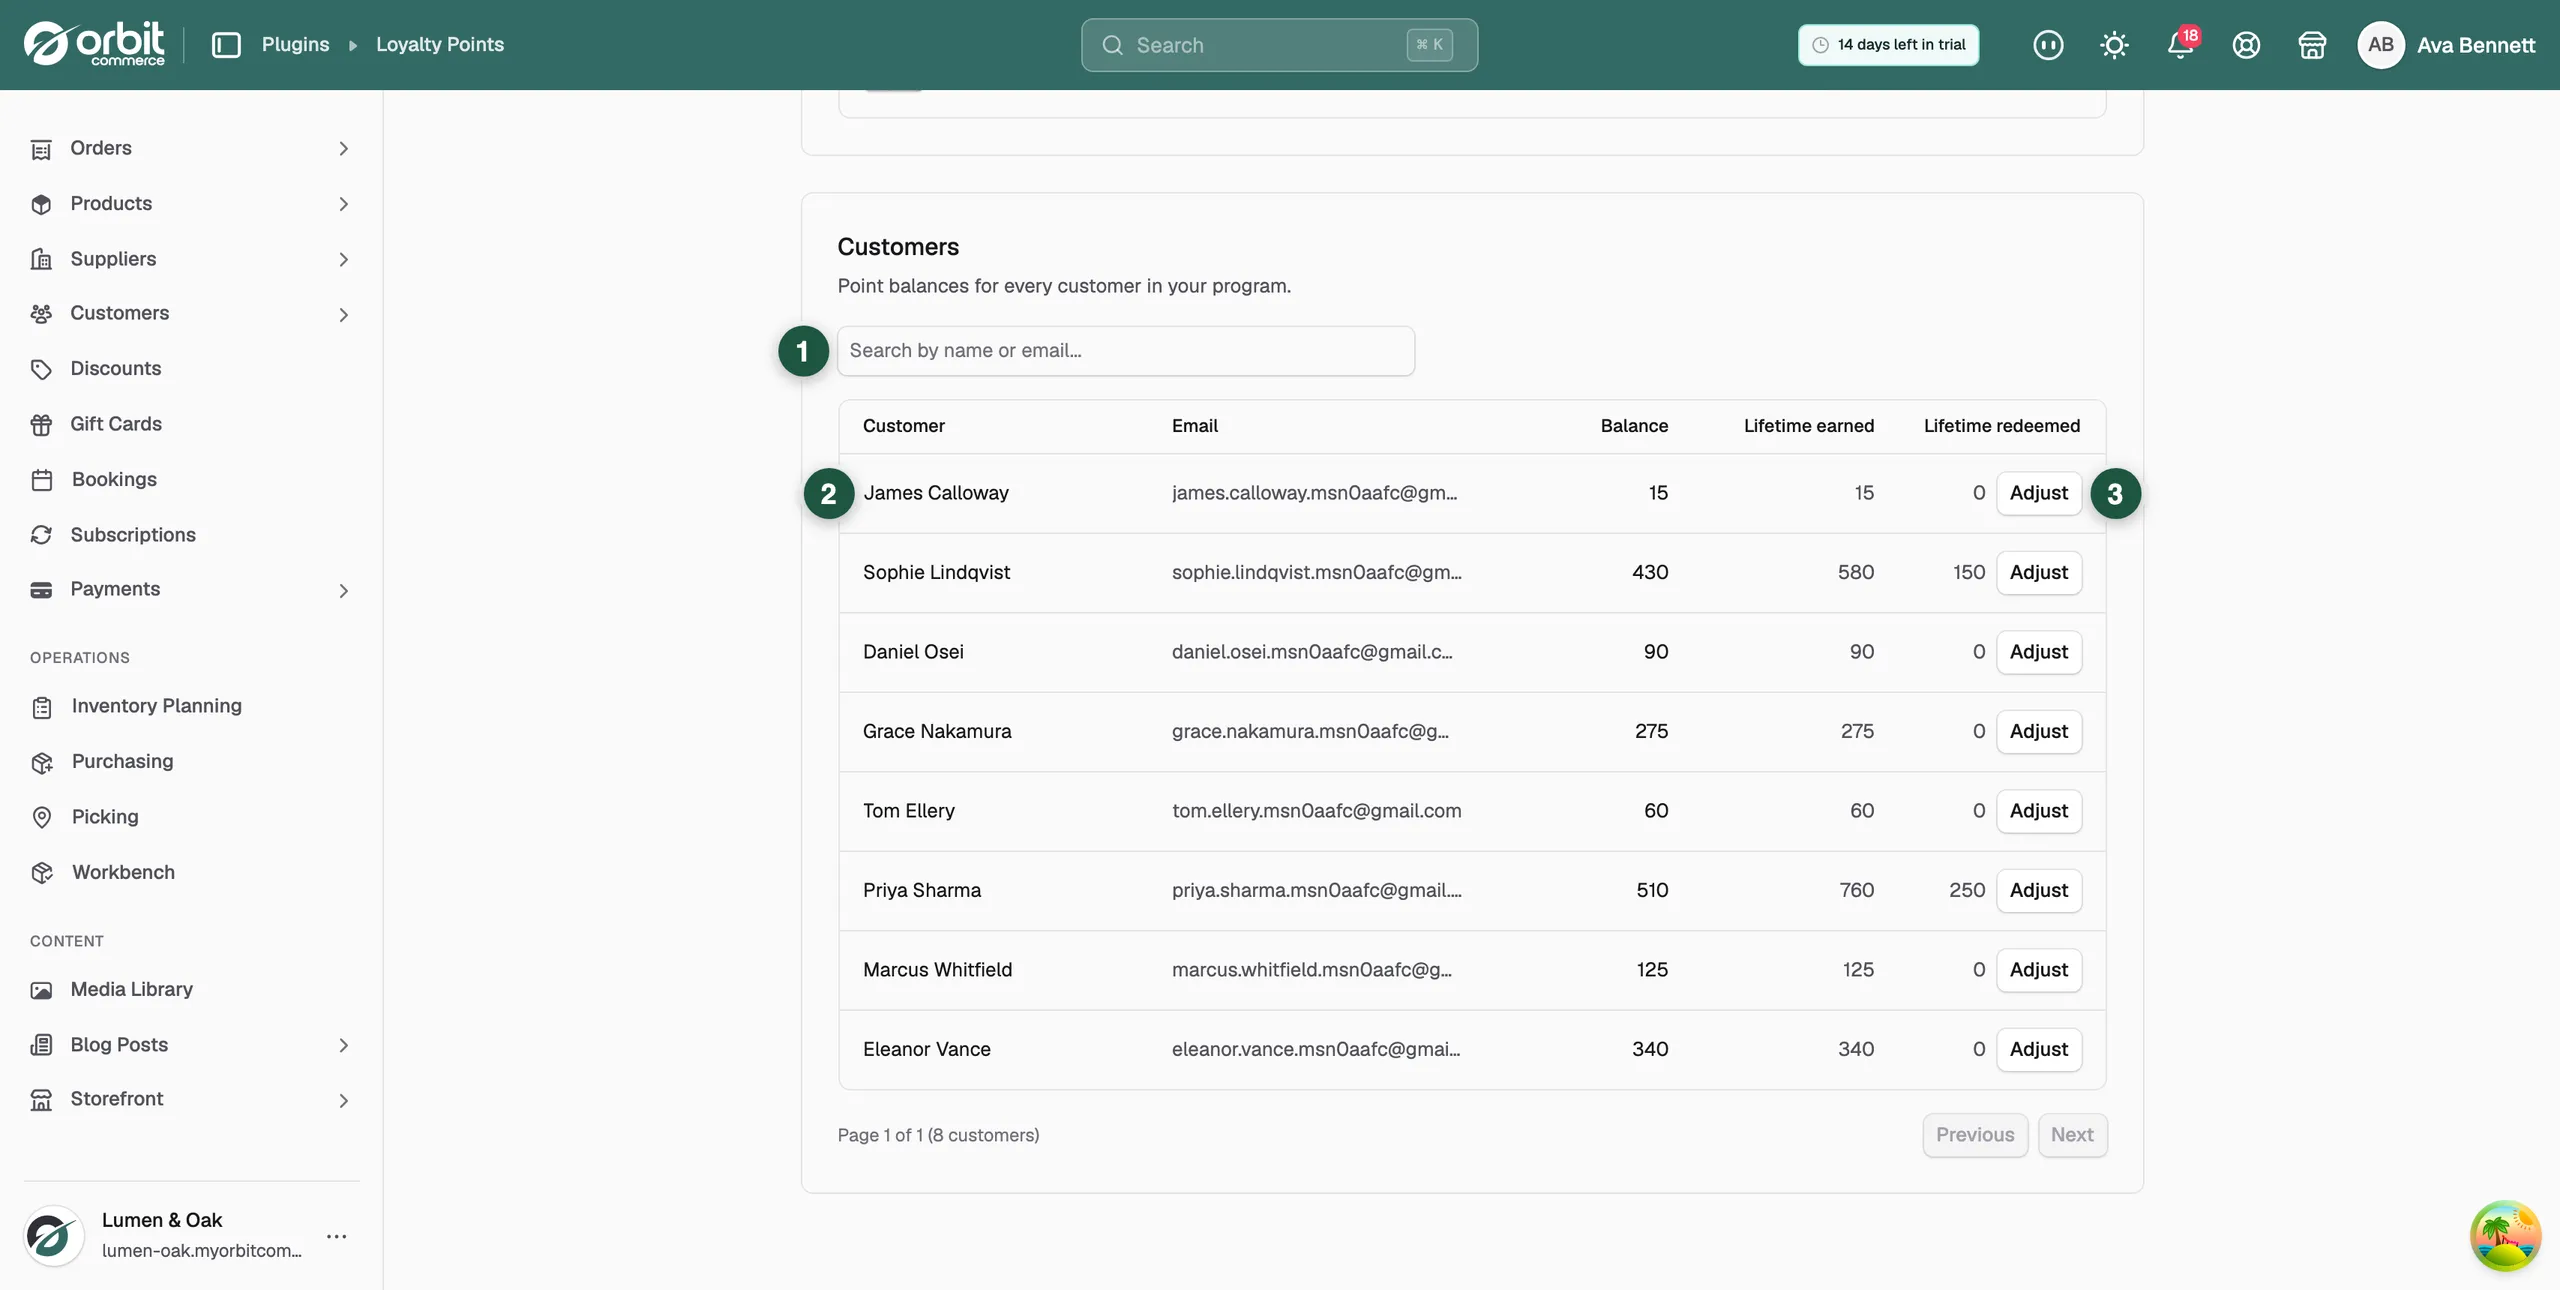
The Customers card lists every customer in your programme with their Balance, Lifetime earned and Lifetime redeemed. It reads No customers found. until the first points are earned.
- In the Search by name or email... field, find the customer.
- Click Adjust on their row. The dialog Adjust points for [name] opens and shows their current balance.
- In Points, enter a positive number to add points or a negative number to deduct them, for example 50 or -20. You cannot deduct more points than the customer has.
- In Note, add a reason if you want one. It is optional.
- Click Apply adjustment. The message Balance updated appears.
What customers see
Customers see their points balance and your rewards on your storefront, using your points name and primary colour. They spend their balance from the Loyalty page in their account.
Note: Price rewards so a typical repeat customer can reach one. Check the Customers card for real balances before you set points prices.
The Loyalty page in their account
Your customer signs in and opens Loyalty in their account. The first card is their balance, headed with your points name, so it reads Points balance, or Stars balance if you named your points Stars. The card holds:
- The balance as a large number, in your primary colour.
- Two lifetime totals: points earned all-time and points redeemed.
- One line for your earning rule, such as Earn 10 Points on every order or Earn 2 Points per £1 spent.
Below it is Points history. Each row gives the reason, the date, the points as +10 or -50, and the Balance after that row. It shows 10 rows at a time, with Previous and Next buttons. Until the first points land it says there is no activity yet. Customers of a store without the plugin see No loyalty programme yet instead.
When points land
- Points are added when the order is paid, not when you send it. The row appears in Points history straight away.
- An order earns once. A repeated payment notice does not pay out twice.
- Points follow the earning rule as it stood when the order was paid.
- Guest orders earn nothing. The order has to belong to a customer account.
- Nothing is awarded while Loyalty program enabled is off.
- A reward order is paid with points, so it never earns points back.
How a customer redeems a reward
- Your customer opens Loyalty in their account and goes to Redeem Points, which uses your points name.
- They click Redeem on a reward. A reward they cannot afford shows Not enough Points and its button is greyed out.
- A box opens headed Redeem [product]? with the points price, their Current balance and their Balance after redeeming. It tells them the order goes to their default delivery address.
- They click Confirm redemption. The box changes to Reward redeemed with the new order number, their new balance and a View order button.
The reward comes through as a normal order in your Orders list, paid with points instead of money, and you send it as you would any other. If the customer has no default delivery address saved, or their balance has changed, the box shows the reason and no order is placed. The whole section is hidden while Allow customers to redeem points for products is off.
Refunds and cancelled orders
- You cancel an order: the points earned on it are taken back.
- You refund an order in full: the points earned on it are taken back.
- You refund part of an order: the customer keeps the points.
- You cancel a reward order: the points the customer spent are returned to their balance.
Each of these is its own row in Points history, so your customer can see why their balance moved.
Show points on a page you build
The page builder has a Loyalty Points account element that shows the balance and recent activity on any account page you build. It needs the Loyalty Points plugin to be installed.
Related guides
Was this helpful?
0 people found this helpful