Fixing stock numbers that do not match
Find where stock drift came from, from committed units to unreceived transfers, then correct the count and record the reason.
Orbit says 14 and the shelf says 9. Stock drift happens in every store: mis-picks, damages, miscounted deliveries, the odd theft. The question is not whether there is drift, it is where it came from. From your Orbit dashboard, go to Products, then Inventory, and work down this list.
You are reading the wrong column
The inventory table has five numbers per item and they mean different things. Available is what customers can still buy, not what is on the shelf.
- On Hand: everything physically at that location.
- Committed: reserved for orders you have not fulfilled yet.
- Unavailable: damaged, on quality hold, or held back as safety stock.
- Available: On Hand minus Committed minus Unavailable.
- Incoming: on its way from a purchase order or a transfer.
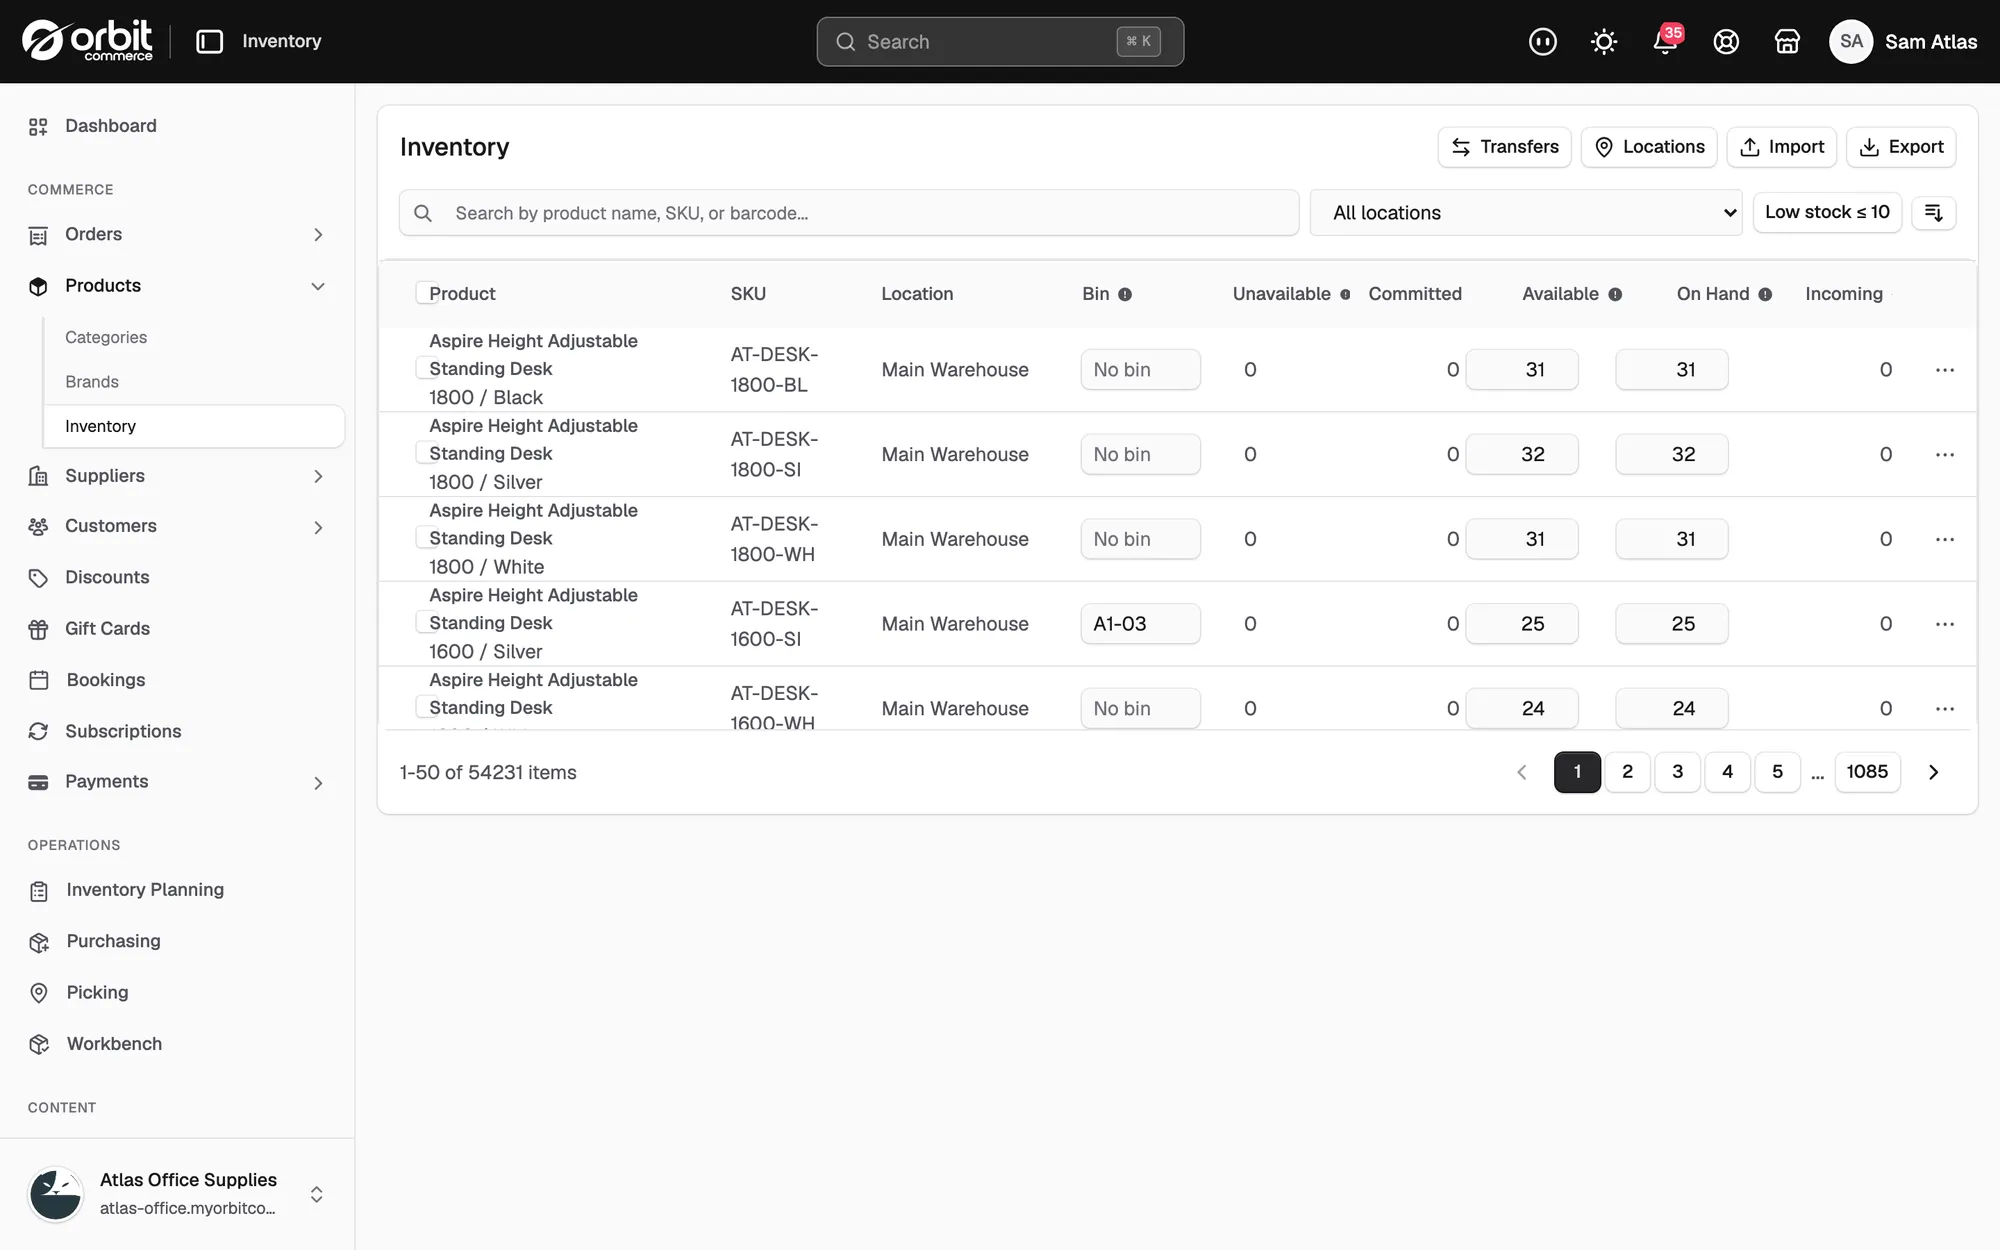
- Check you are looking at the right location. Use the location filter above the table if you have more than one.
- Compare the shelf with On Hand, not with Available. Five committed units explain a gap of five with no drift at all.
Stock arrived but was never received
A delivery that turned up but was never received against its purchase order leaves the stock invisible to Orbit.
- Check the Incoming column for the item. A number there means Orbit is still waiting for that stock to be received.
- Open your purchase orders and look for any that are still open while the goods are on the shelf.
- Receive them, and the quantity moves into On Hand.
A transfer between locations was never completed
A transfer that was created but never received moves nothing, while everyone assumes the stock has landed.
- On the Inventory page, click Transfers.
- Look for transfers sitting at Draft, Pending, In Transit or Partially Received.
- Open each one and check whether the goods have actually arrived. Receiving it corrects both locations at once.
A refund or return did not put the item back
Refunds and returns only add stock back when you tell them to.
- Open the recent refunds and returns for that product.
- On a refund, check whether Restock items was ticked.
- On a return, check the item was received with the Restock option rather than held or written off. Only restock puts a unit back on sale.
Somebody changed the number by hand
- Find the item in the inventory table.
- Click the dots at the end of the row and choose View history.
- Read when the quantity last changed, who changed it and the reason they gave. An adjustment with no reason is usually the one you are hunting.
Damage, theft or mis-picks
When the other causes are ruled out, what is left is real shrinkage. Only a count settles it, and the fix is the same either way: correct the number and record why.
Correct the number
- Count what is actually on the shelf.
- On Products, then Inventory, point at the item's row. Arrows appear beside the quantity.
- Click the arrow in the Available column.
- Choose Set to replace the number with your count. Add adjusts by a number instead.
- Type what you counted.
- Click Reason and pick Count. The reason is saved with the change.
- Click Save. The change waits in the unsaved changes bar until you confirm it.
- Click Save changes. To back out instead, click Discard changes and the old number returns.
The Low stock filter above the table narrows the list to items at or under your low stock threshold. It is a quick way to pick which items to count first.
Note: If your sidebar has an Operations section, Picking has a Cycle counts tab. A count scoped to one bin or one category checks the shelf against Orbit and applies every correction in one click. Not every plan includes it.
If it still does not work
If the numbers keep drifting after a count, contact support with the SKU, the location, the count you took and the date. Send a screenshot of View history for that item so the changes can be traced.
Related guides
Was this helpful?
0 people found this helpful