Fulfilling an order and adding tracking
Open an order, send the items, and add a tracking number or a courier label. Also see how far your suppliers have got on the lines they ship.
Open an order to see everything on it and to send the goods. From the order page you fulfil items, add tracking numbers, refund, cancel and read the history of the order. This is where most of your day-to-day order work happens.
Considerations
- Always add a tracking number or a courier label when you fulfil. A fulfilment saved without either stays Pending, so the order does not move to Fulfilled and the customer gets no shipped email.
- Use Courier Integration only appears if you have connected a courier. Without one, you add tracking by hand.
- Once an order is both paid and fulfilled, Edit is locked. Refund or cancel the order instead.
- Orders placed through your storefront arrive carrying Fulfillment #1 with a pending badge. That is normal. Fulfilling fills it in.
Open an order
- From your Orbit dashboard, go to Orders.
- Click the order number in the list. The order page opens.
What the order page shows
The header carries the order number, the date it was placed, and a badge for payment and for fulfilment. An Archived badge shows if you have archived the order. Next to them are the buttons you act with:
- Edit: change items, addresses or details. See Editing an order.
- Print: open a packing slip for the order.
- VAT invoice and Email invoice: show when the order carries tax. See Sending an invoice.
- Print label: shows only when a courier label was bought for the order.
- Refund: shows on a paid order. See Refunding an order.
- More actions: View order status page, Duplicate, Cancel Order and Archive.
Below the header, Order Items lists what was bought, with a Ship by date above it while there is still something to send. The table columns are Product, SKU, Qty, Price, Discounted and Subtotal. Under it, Order Summary breaks the money down into subtotal, shipping, discount, tax and total.
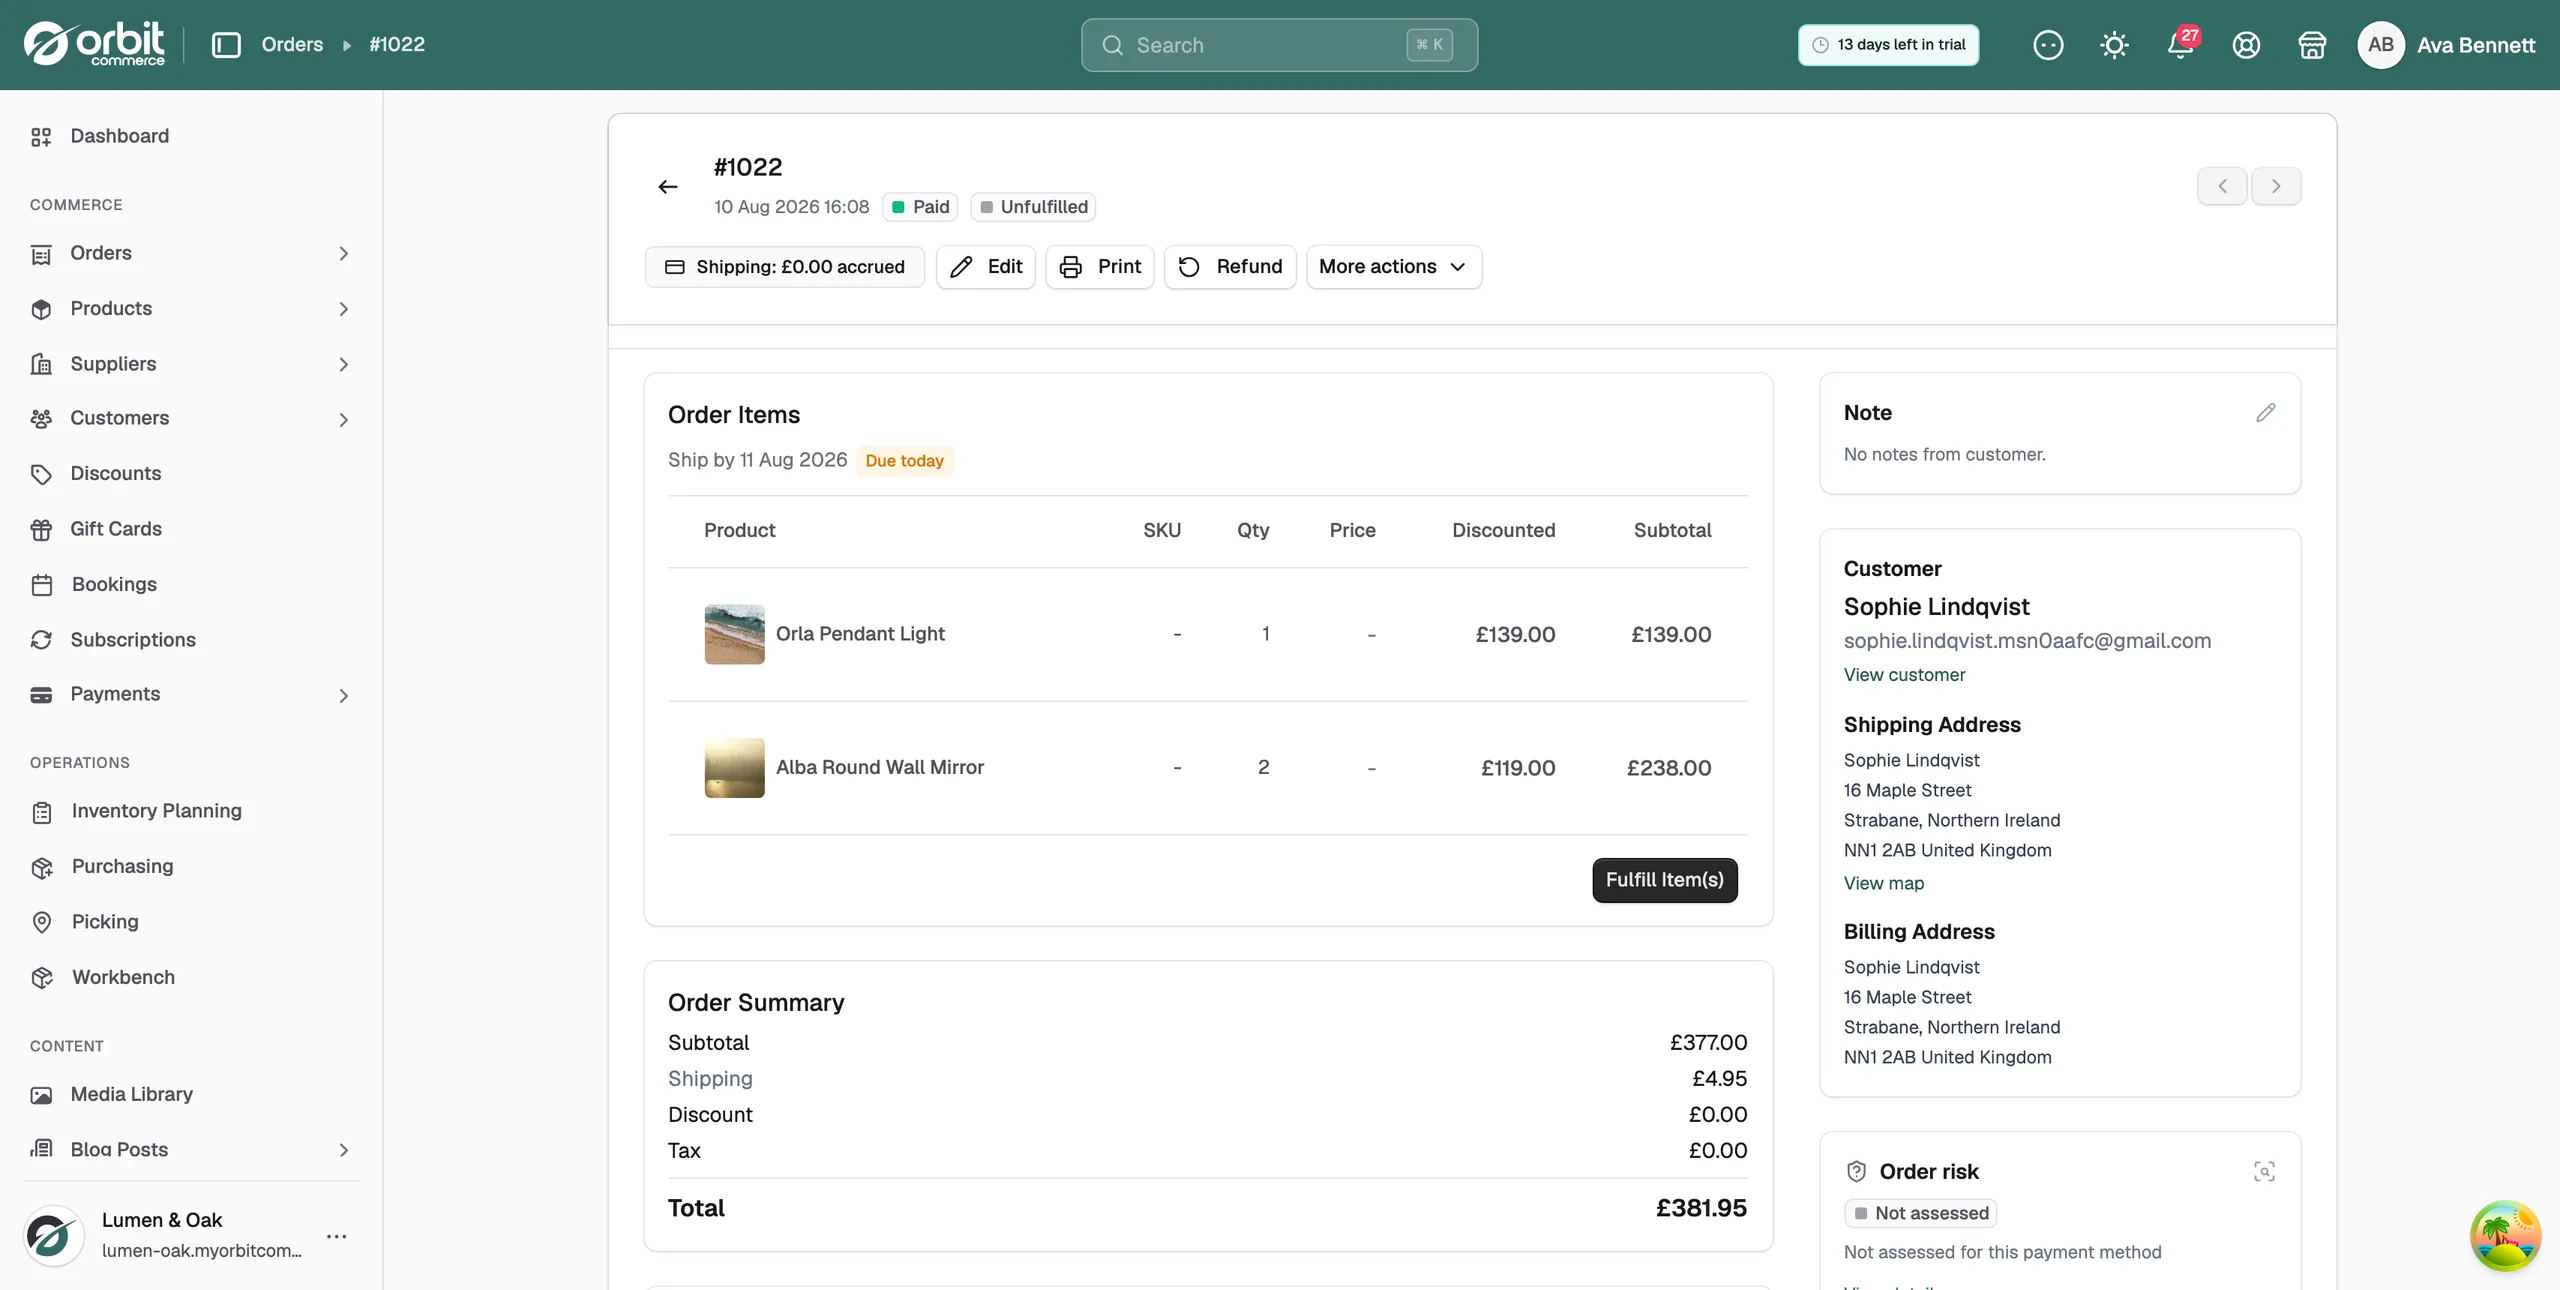
The panels down the right-hand side hold the rest:
- Note: any note on the order, such as a delivery instruction. Click the pencil to edit it, then the tick to save.
- Customer: the name and email, with a View customer link to their record.
- Shipping Address: where the order is going, with a View map link.
- Billing Address: where it is billed. If it is the same, this reads Same as shipping address.
- Tags: any tags on the order.
Custom Fields sits below both columns. It holds any extra fields your store records against an order.
Fulfil items and add tracking
- Open the order and find the Order Items card.
- Click Fulfill Item(s). The Fulfill order panel opens under the table.
- Check the quantities under Items in this fulfillment. Each line starts at the quantity still to send, with the number left shown beside it. Set a quantity to 0 to leave a line out.
- If you have connected a courier, turn on Use Courier Integration and pick a Courier Service. Orbit buys the label and charges it to the card saved under Settings and Shipping.
- To add tracking by hand instead, pick the carrier from the list. It starts with Custom, then the carriers set up for your store.
- Type the Tracking number. If the carrier has a tracking link, the Tracking URL fills in for you. You can type your own instead.
- Click Fulfill. The panel closes and the fulfilment badge turns green.
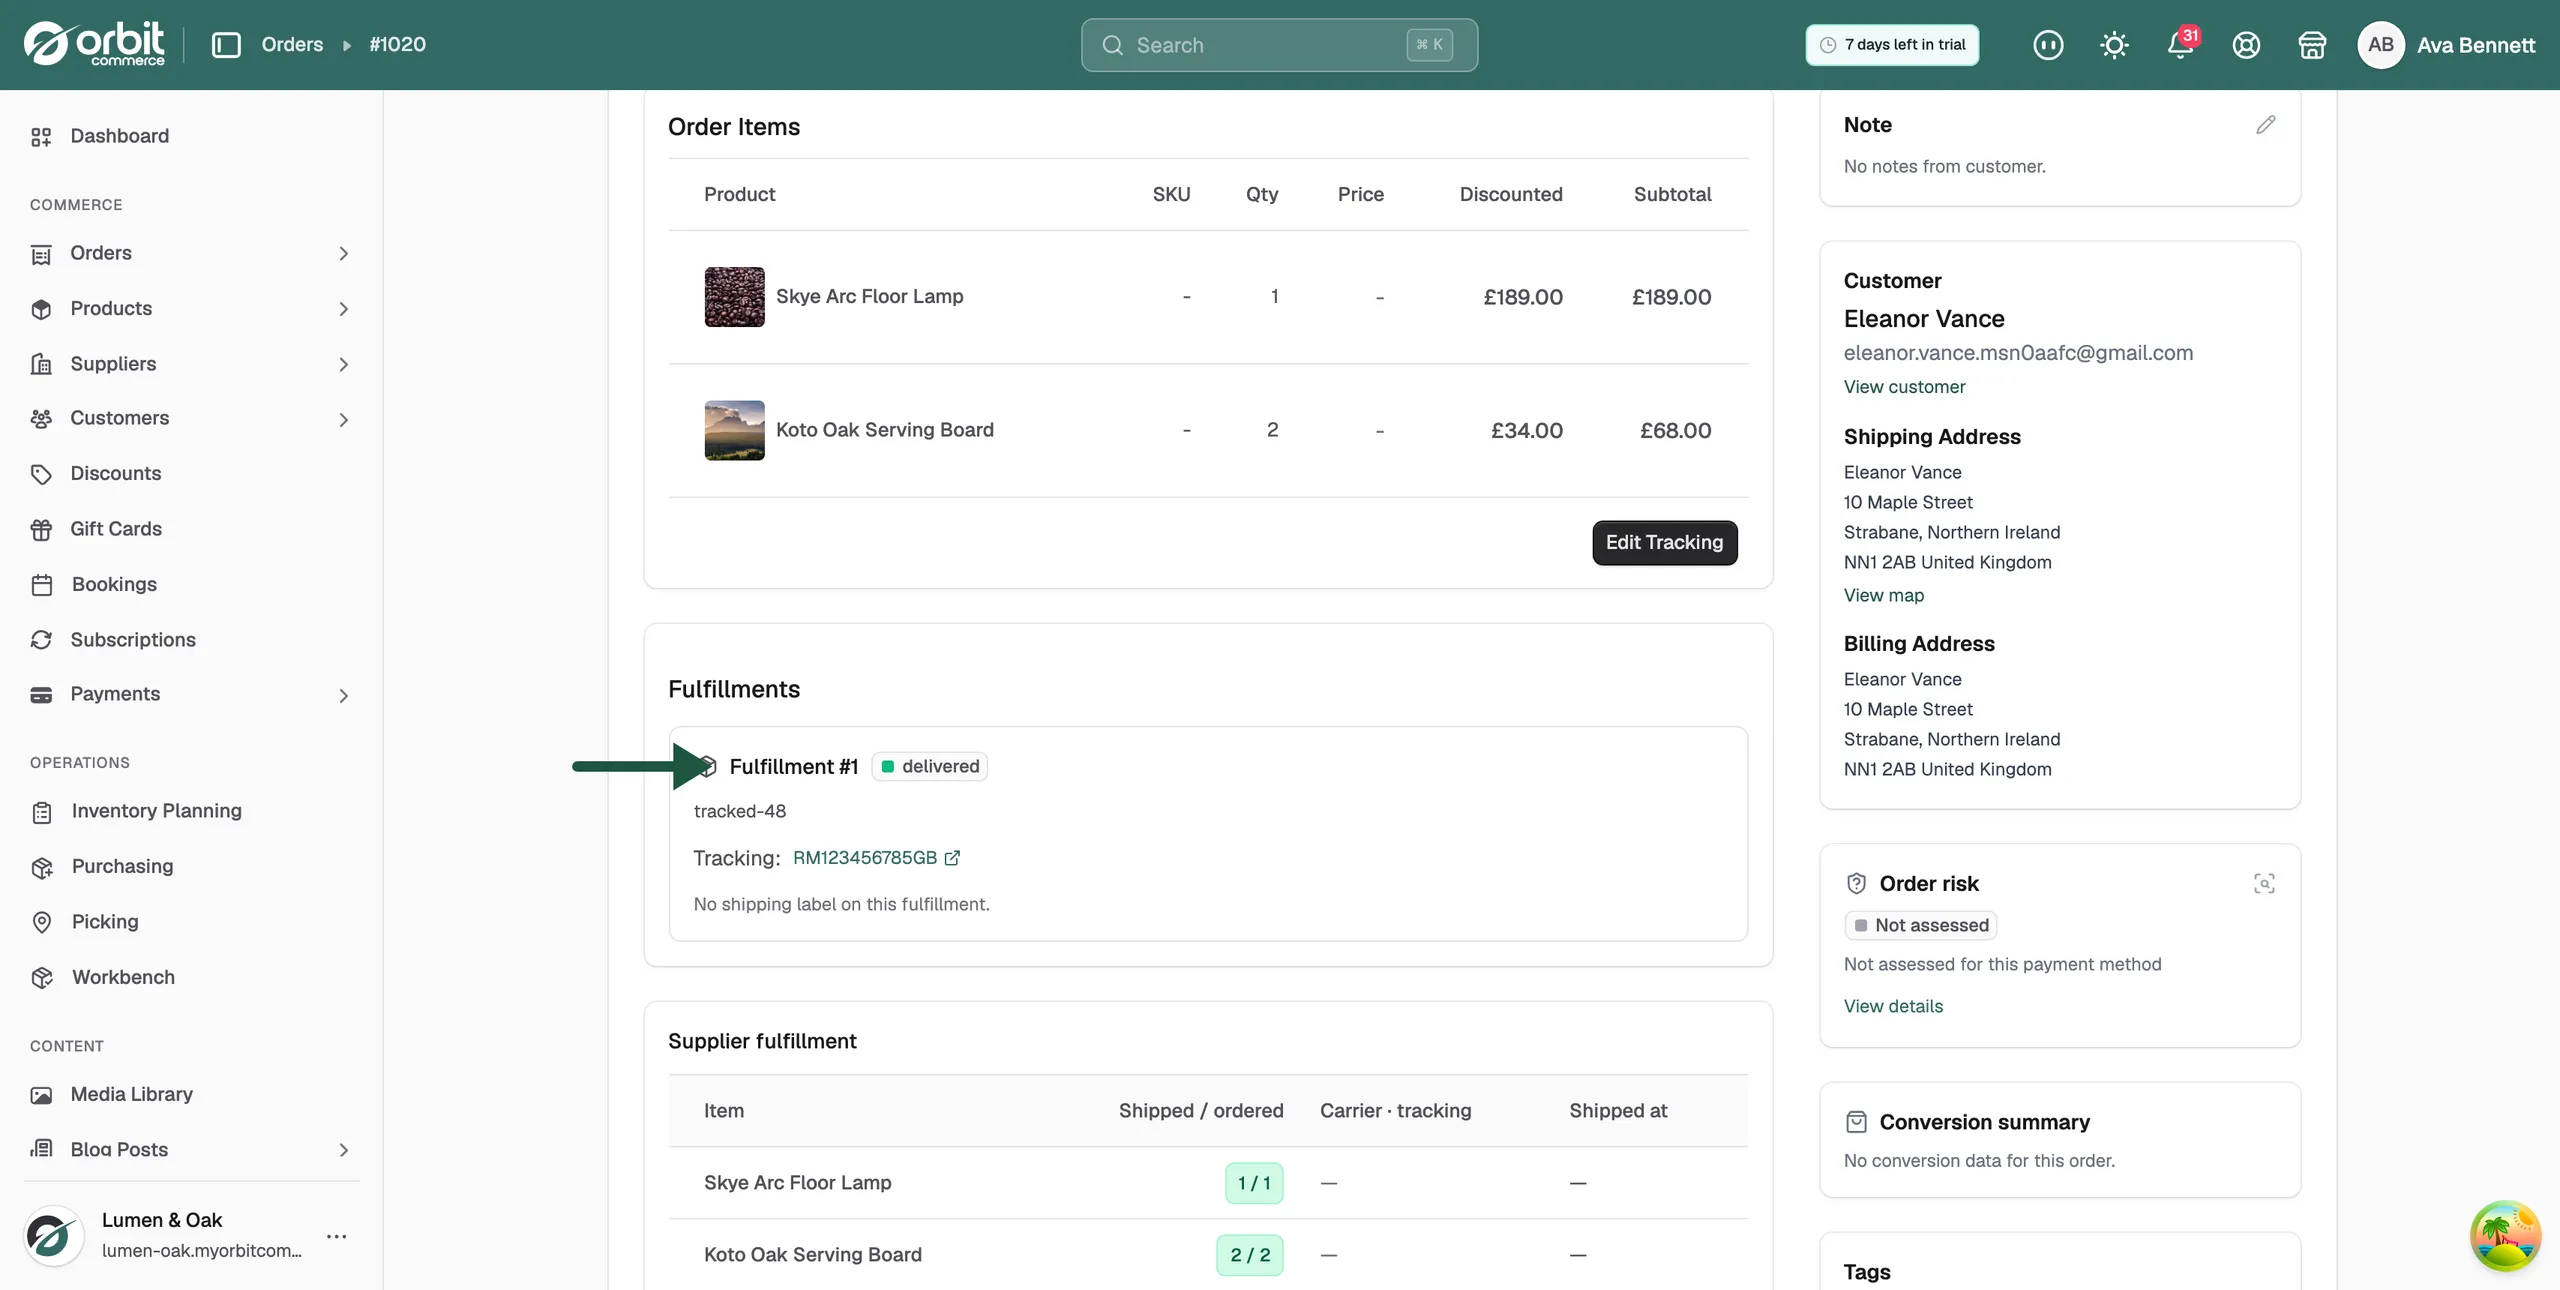
The Fulfillments card now shows the fulfilment, its status, the tracking number as a link and the carrier name. If no label was bought it reads No shipping label on this fulfillment.
Warning: Do not leave the tracking number empty. A fulfilment with no tracking number and no label stays Pending, and the customer hears nothing.
Send more than one parcel
- Fill in the first carrier and tracking number as above.
- Click + Add another tracking number.
- A second card appears headed Tracking #2. Pick its carrier and type its tracking number.
- Repeat for each parcel, then click Fulfill. Every number shows on the fulfilment, and the customer can follow each parcel.
To send part of an order now and the rest later, see Fulfilling part of an order.
Change tracking after you have fulfilled
- Open the order.
- Click Edit Tracking in the Order Items card. This is the same button, renamed once the order is fulfilled.
- Change the carrier, the tracking number or the tracking URL.
- Click Save tracking.
Add a note to the timeline
The Timeline at the foot of the page records what has happened to the order and when, newest first.
- Scroll to Timeline.
- Type in the Leave a comment... box.
- Tick Notify customer if the customer should get your comment by email.
- Click Post.
Refund, cancel or archive the order
- To give money back, click Refund in the header. See Refunding an order.
- To stop the order going ahead, click More actions, then Cancel Order. See Cancelling an order.
- To move a finished order out of your main list, click More actions, then Archive.
Supplier fulfilment on an order
Some of the products you sell can come from a supplier you have connected to your store. The supplier ships those lines, not you. The Supplier fulfillment card shows how far they have got. It sits below the Fulfillments card and above Order Summary.
The card only appears when there is something to report. That means a line on the order came from a supplier and they have shipped some of it or added tracking, or there is a warning about a supplier. Lines you send yourself are not listed here, and draft orders never show the card.
Each row is one item a supplier is handling:
- Item: the product name, with its SKU underneath.
- Shipped / ordered: how many the supplier has sent, out of how many were ordered. The badge is orange while some are still to come, and green once the whole line has gone.
- Carrier · tracking: the carrier and the tracking number the supplier entered. If they added a tracking link, click it to open the carrier's page in a new tab. A dash means no tracking yet.
- Shipped at: the date and time the supplier marked the line as shipped. A dash means it has not shipped yet.
An Auto-synced badge sits next to the tracking. Hover over it to read where the tracking came from: "Tracking written by the supplier (manual entry in their dashboard, or via an automated fulfillment-sync feed)." Either way the supplier wrote it, so this card is read-only. You cannot change these lines, add tracking to them or mark them as shipped. The rest of the order works as normal.
When a supplier does not take purchase orders
When a customer order comes in, Orbit sends a purchase order to each supplier on it. If a supplier does not accept purchase orders through Orbit, nothing reaches them. The card then shows a warning headed Some suppliers don’t accept purchase orders via Orbit, with a line for each supplier it could not send to, and the reminder "Reach out to those suppliers directly to fulfil the affected lines."
Those suppliers have not been told about the order. Contact them yourself, by phone or email, and place the order with them the way you normally would. Once they have shipped, add the tracking on the order yourself with Fulfill Item(s), as above.
To see the purchase orders Orbit did send, or to raise one by hand, see Ordering stock from a supplier.
Note: If the card says it "Couldn't reach the notifications service", Orbit could not load these warnings. Reload the page to check whether any are waiting.
Related guides
Was this helpful?
0 people found this helpful